

Now you can use Arm native builds of PyTorch to develop, train and test short-scale machine learning models locally on Arm powered Copilot+ PCs. This includes areas such as image classification, natural language processing, and generative AI like Stable Diffusion which will be exemplified below.
Getting Started
Prerequisites:
- To address missing dependencies, we recommend installing MSVC and Rust
- Visual Studio Build Tools or any Visual Studio
- In Visual Studio Installer, please select Desktop development with C++
- Visual Studio Build Tools or any Visual Studio

- In Visual Studio Installer, make sure VS 2022 C++ ARM64/ARM64EC build tools (latest) selected

- Install Rust
- Select ARM64 installer for Python Release Python 3.12.9 | Python.org.
PyTorch:
- To install PyTorch Stable release (2.7.0):
pip install --extra-index-url https://download.pytorch.org/whl torch
- To access Preview (Nightly) build:
pip install --pre torch --index-url https://download.pytorch.org/whl/nightly/cpu
LibTorch:
- The getting started and installation guide for LibTorch can be accessed on PyTorch’s website
- To access stable LibTorch stable release, select litroch and follow instructions
- To access Nightly builds: Release, Debug
Recommendations:
It is advisable to create a Virtual Environment (venv) within your projects. A virtual environment separates dependencies between projects, providing isolation.
For further information, please refer to the documentation available on VS Code and Python.
Example:
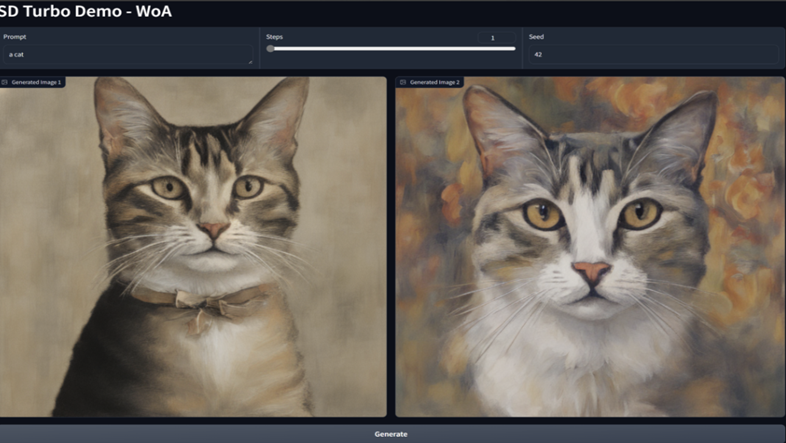
In this next example, we have used Arm native PyTorch binaries with stabilityai/sd-turbo model for stable diffusion. Some of the terminologies used in this example:
Prompt: A descriptive phrase or sentence that will be used by the Stable Diffusion model to generate images.
Steps: A slider that allows the user to select the number of inferences steps the model should take to generate the images. More steps can lead to higher quality images but will take longer to process.
Seed: A numerical input field where the user can enter a specific seed value to ensure reproducibility of the generated images. If left empty, a random seed will be used, resulting in different images each time for the same prompt. The default value is 42.
Below is the code, which can also be accessed on the GitHub repository, pytorch-examples/stable-diffusion:
import gradio as gr

import torch

from diffusers import StableDiffusionPipeline


device = "cpu"

pipe = StableDiffusionPipeline.from_pretrained("stabilityai/sd-turbo", torch_dtype=torch.float32)

pipe = pipe.to(device)


def generate_image(prompt, steps, seed):

generator = None

if seed is not None:

generator = torch.Generator(device=device).manual_seed(seed)


# guidance is 0.0 as recommended by sd-turbo

# width and height are set to 512 as recommended by sd-turbo

result = pipe(prompt, num_inference_steps=steps,        num_images_per_prompt=2, guidance_scale=0.0, generator=generator, width=512, height=512)

return result.images[0], result.images[1]


with gr.Blocks() as demo:

gr.Markdown("# SD Turbo Demo - WoA")

with gr.Row():

prompt = gr.Textbox(label="Prompt", placeholder="Enter your prompt here")

steps = gr.Slider(minimum=1, maximum=5, step=1, value=1, label="Steps")

seed = gr.Number(label="Seed (leave empty for random seed)", value=42, precision=0)

with gr.Row():

image1 = gr.Image(type="pil", label="Generated Image 1")

image2 = gr.Image(type="pil", label="Generated Image 2")

gr.Button("Generate").click(

fn=generate_image,

inputs=[prompt, steps, seed],

outputs=[image1, image2]

)


demo.launch(share=False)
Output:
Disclaimer: The model used in this example is stabilityai/sd-turbo. As this is a basic generative AI application, we do not assume responsibility for the results generated. You are solely responsible for generating images on your computer.
Note:
Some packages you may use alongside PyTorch don’t have Arm native support for Windows.
pip can automatically install dependencies from source code (tar.gz) and compile them into “.whl” files using MSVC and Rust on your system.
Please check the prerequisites section for details.
- NumPy 2.2.3 can be installed via compilation.
pip install numpy==2.2.3
- safetensors 0.5.3 can be installed via compilation.
pip install safetensors==0.5.3
Conclusion
Developers can now start using stable Arm native PyTorch builds for Windows to create applications that leverage AI and utilize the full potential of ARM architecture. Give the native binaries a try today! Download here.